Sunday, August 15, 2010

Home Made Moon Pies!!

These are great!  Start with peanut butter cookies:


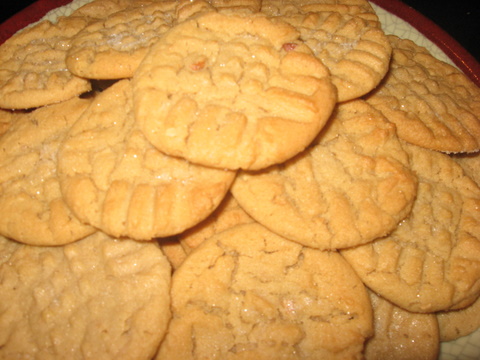
Peanut Butter Cookies
3 sticks unsalted butter, room temperature
1 1/2 cups sugar
1 3/4 cups brown sugar
1/2 cup peanut or other vegetable oil
 2 cups +1 T (20 3/4 oz) chunky peanut butter
3 large eggs
2 tsp vanilla
3 3/4 cups (18 oz) all-purpose flour
1 T baking soda
1 1/2 tsp salt
sugar for sprinkling on top
Combine the flour, baking soda, and salt in small bowl and mix (Alton recommends doing this by pulsing the mixture a few times a food processor.)  Mix the butter alone in a stand mixer or with a hand mixer for about one minute.  Add the sugars slowly.  Once all of the sugar has been incorporated, beat the mixture on medium speed until it lightens noticeably in texture and increases slightly in volume.  Drop the mixer speed to low and add the peanut butter and oil all in one dose.  Increase the mixer speed to medium and cream for another 2 minutes until well combined. 
Reduce the mixer speed to low and slowly add the eggs and vanilla, scraping down the sides of the bowl as necessary. 
Add the dry ingredients to the mixture in three installments, scraping down the bowl as necessary.  Chill the dough for about a half an hour.
Preheat the oven to 350 degrees.  Portion the cookies into golf-ball sized balls (mine were a little smaller) and place on cookies sheets.  (I used half-sheet pans lined with parchment paper but greased cookies sheets should work just fine.)  Use a fork to make a criss-cross pattern on the top and then sprinkle with sugar.  Bake the cookies until the cookies are lightly browned around the edges, about 14 to 17 minutes.  (You can bake two sheets of cookies at a time, just rotate them halfway through the cooking time.)  Let the cookies sit for at least 2 minutes on the pans before removing to a rack to cool completely. 

Next we made Marshmallows:

  • 3 packages unflavored gelatin
  • 1 cup ice cold water, divided
  • 12 ounces granulated sugar, approximately 1 1/2 cups
  • 1 cup light corn syrup
  • 1/4 teaspoon kosher salt
  • 1 teaspoon vanilla extract

Directions

Place the gelatin into the bowl of a stand mixer along with 1/2 cup of the water. Have the whisk attachment standing by.
In a small saucepan combine the remaining 1/2 cup water, granulated sugar, corn syrup and salt. Place over medium high heat, cover and allow to cook for 3 to 4 minutes. Uncover, clip a candy thermometer onto the side of the pan and continue to cook until the mixture reaches 240 degrees F, approximately 7 to 8 minutes. Once the mixture reaches this temperature, immediately remove from the heat.
Turn the mixer on low speed and, while running, slowly pour the sugar syrup down the side of the bowl into the gelatin mixture. Once you have added all of the syrup, increase the speed to high. Continue to whip until the mixture becomes very thick and is lukewarm, approximately 12 to 15 minutes. Add the vanilla during the last minute of whipping. 


Quickly spatula into a roll of parchment paper and pipe it onto the cookies and make sandwiches out of them.


In double broiler melt chocolate chips taking care not to overheat them and destroy the temper.  Dip one side of the sandwich cookies in chocolate.  Allow everything to thoroughly cool and enjoy!

Saturday, July 17, 2010

Cream Cheese Sopapilla's


Ingredients:
3 (8 ounce) packages cream cheese, softened
1 1/2 cups white sugar
1 1/2 teaspoons vanilla extract
2 (8 ounce) cans crescent roll dough

1/2 cup melted butter
1/2 cup white sugar
1 teaspoon ground cinnamon
1/4 cup sliced almonds

Honey

Directions:
Preheat an oven to 350 degrees F (175 degrees C).
Beat the cream cheese with 1 1/2 cups of sugar, and the vanilla extract in a bowl until smooth. Unroll the cans of crescent roll dough, and use a rolling pin to shape the each piece into 9x13 inch rectangles. Press one piece into the bottom of a 9x13 inch baking dish. Evenly spread the cream cheese mixture into the baking dish, then cover with the remaining piece of crescent dough.
Drizzle the melted butter evenly over the top of the cheesecake. Stir the remaining 1/2 cup of sugar together with the cinnamon in a small bowl, and sprinkle over the cheesecake along with the almonds.
Bake in the preheated oven until the crescent dough has puffed and turned golden brown, about 45 minutes.  Remove and drizzle honey over entire crust. Cool completely in the pan before cutting into 12 squares.

    Sunday, June 20, 2010

    Broiled Neapolitan-Style Pizza

    Ingredients
    • About 12 ounces crushed San Marzano tomatoes or another variety of premium plum tomato
    • Kosher salt
    • No-knead pizza dough
    • About 20 thin slices sweet or hot sopressata (optional)
    • About 4 cups fresh mozzarella
    • Parmigiano-Reggiano
    • A couple large handfuls of basil chiffonade
    • Extra virgin olive oil
    Procedure
    1. Season tomatoes lightly with salt. Place in a strainer lined with cheesecloth or paper towels and set over a bowl to drain excess liquid. Reserve strained tomato juice for another purpose.
    2. Turn broiler on high to preheat. Place the largest cast iron skillet you have under the broiler, on the stove over maximum heat, or on a ripping hot grill. After about 20 minutes, both the broiler and the skillet should be hot enough.
    3. Roll out or stretch pizza dough as thin as possible on a floured cookie sheet. (If you have a pizza peel, roll it out on the counter then transfer it to the peel.) Immediately top with tomatoes, sopressata, and mozzarella, torn into large chunks.
    4. Invert skillet and transfer pizza to underside. Slide under the broiler as close to the heating element as possible without generating copious smoke. Cook until dough is puffy and well-charred, about 3 or 4 minutes, rotating skillet 180 degrees halfway through cooking to brown crust evenly.
    5. Remove excess flour from crust with a pastry brush and transfer pizza to a plate. Top with finely grated Parmigiano-Reggiano, basil, and a light drizzle of olive oil. Slice and serve.

    No Knead Pizza Dough

    Ingredients
    1 1/2 cups all-purpose flour
    1 1/2 cups bread flour, plus more for dusting
    1 1/4 teaspoons kosher salt
    1 teaspoon granulated sugar
    1/4 teaspoon instant yeast
    1 1/2 cups room temperature water
    1/4 cup extra virgin olive oil, plus more for drizzling
    Procedure
    1. Whisk together flours, salt, sugar, and yeast in a large bowl. Incorporate water and olive oil with your hands or with a dampened stirrer until flour is fully hydrated and there are no dry lumps.
    2. Drizzle some olive oil around the perimeter of the dough to prevent sticking. Cover with plastic wrap and store in a warm, dry place, such as an oven with the pilot light on, for 12 to 24 hours to let rise.
    3. Punch down dough, turn out onto a surface lightly dusted with bread flour, and let rest for 20 minutes. Divide dough into 4 rounds of equal size. Place each round on a heavily floured cotton (not terrycloth) tea towel, flour the top of each round, and fold up the edges of the towels to cover. Let rest for 1 to 2 hours.
    4. Working quickly to prevent sticking, turn out dough rounds one at a time onto a heavily floured cookie sheet and roll out as thinly as possible. You don't have to make a perfect circle of dough.
    5. Top as desired and bake at the highest possible heat.

    Tuesday, June 8, 2010

    Baked Doughnuts

    Don't over bake these, if anything, under bake them a bit - they will continue baking outside the oven for a few minutes. You want an interior that is moist and tender - not dry. Also, be sure to cut big enough holes in the center of your doughnuts - too small and they will bake entirely shut. Remember they rise, and they rise even more when they are baking. These really need to be made-to-order, but you can make and shape the dough the night before if you want to serve them for brunch. Instructions: after shaping, place doughnuts on baking sheet, cover and place in the refrigerator overnight. Pull them out an hour before baking, and let rise in a warm place before baking.
    1 1/3 cups warm milk, 95 to 105 degrees (divided)
    1 packet active dry yeast (2 1/4 teaspoons)
    2 tablespoons butter
    2/3 cup sugar
    2 eggs
    5 cups all-purpose flour (alternately, white whole wheat might work - haven't tried it yet)
    A pinch or two of nutmeg, freshly grated
    1 teaspoon fine grain sea salt
    1/2 cup unsalted butter, melted
    1 1/2 cups sugar
    1 tablespoon cinnamon
    Place 1/3 cup of the warm milk in the bowl of an electric mixer. Stir in the yeast and set aside for five minutes or so. Be sure your milk isn't too hot or it will kill the yeast. Stir the butter and sugar into the remaining cup of warm milk and add it to the yeast mixture. With a fork, stir in the eggs, flour, nutmeg, and salt - just until the flour is incorporated. With the dough hook attachment of your mixer beat the dough for a few minutes at medium speed. This is where you are going to need to make adjustments - if your dough is overly sticky, add flour a few tablespoons at a time. Too dry? Add more milk a bit at a time. You want the dough to pull away from the sides of the mixing bowl and eventually become supple and smooth. Turn it out onto a floured counter-top, knead a few times (the dough should be barely sticky), and shape into a ball.
    Transfer the dough to a buttered (or oiled) bowl, cover, put in a warm place (I turn on the oven at this point and set the bowl on top), and let rise for an hour or until the dough has roughly doubled in size.
    Punch down the dough and roll it out 1/2-inch thick on your floured countertop. Most people (like myself) don't have a doughnut cutter, instead I use a 2-3 inch cookie cutter to stamp out circles. Transfer the circles to a parchment-lined baking sheet and stamp out the smaller inner circles using a smaller cutter. If you cut the inner holes out any earlier, they become distorted when you attempt to move them. Cover with a clean cloth and let rise for another 45 minutes.
    Bake in a 375 degree oven until the bottoms are just golden, 8 to 10 minutes - start checking around 8. While the doughnuts are baking, place the butter in a medium bowl. Place the sugar and cinnamon in a separate bowl.
    Remove the doughnuts from the oven and let cool for just a minute or two. Dip each one in the melted butter and a quick toss in the sugar bowl. Eat immediately if not sooner.
    Makes 1 1/2 - 2 dozen medium doughnuts.

    Tuesday, May 25, 2010

    Risotto-Style Seafood Pasta

      • 3 tablespoons olive oil
        • 1 ½ cups dried gemelli pasta (or fusilli, orrechiette, really any pasta that is non-noodle-like. Different pastas may require different amounts of liquid/cooking time.)
        • 1 small yellow onion, finely minced
        • 2 leeks, white and light green parts only, thinly sliced
        • 2 garlic cloves, finely minced
        • ½ cup white wine
        • 1 quart fish stock (you can use water if necessary)
        • ½ pound lump crab meat
        • 12 shrimp, cleaned and deveined
        • juice of half a lemon
        • 2 tablespoons lemon zest
        • 1 tablespoon red chili flakes
        • 2 handfuls of arugula

    Heat olive oil over medium heat until shimmering.

    Add pasta and toast, stirring frequently, until it just begins to turn light brown.

    Add onion, leeks, and garlic cloves (along with a pinch of salt and a few grinds of pepper), cooking until translucent, but with no color, about three minutes.

    Add white wine and cook until almost entirely absorbed, about two minutes.

    Add stock, a ladleful at a time, stirring until absorbed. Continue until you have about one more ladle to add and the pasta still has a little more bite than you want. (Don't worry.)

    Add the crabmeat, shrimp, and final ladleful of stock, along with the lemon juice, lemon zest, and chili flakes. Cook until shrimp is pink and pasta has absorbed the stock and has the right bite, approximately three minutes. Check for seasoning.

    Add arugula right at the end. Toss until it begins to wilt slightly, and serve immediately.

    Monday, March 22, 2010

    Cheddar Goldfish Crackers

    Bake Homemade Cheese Crackers (Fishy Smiles Not Included)1 cup all-purpose flour
    3/4 tsp. salt
    1/2 tsp. white ground pepper (optional)
    4 TBSP cold unsalted butter, cut into small pieces
    8 ounces grated cheddar cheese
    3-4 TBSP water

    Pulse the flour, salt and pepper, then add butter and pulse until the mixture resembles coarse meal. Add grated cheese a little at a time until the mixture again resembles coarse meal.

    Pulse in 3 to 4 tablespoons of water, one tablespoon at a time, and only enough so that the dough forms a ball and rides the blade.

    Remove, wrap in plastic, and chill for 20 minutes or up to 24 hours.

    Roll the dough out to 1/8th-inch thickness directly onto a baking sheet.
    Using a knife or pizza cutter, cut 1 inch squares, then bake at 350° F for 15-20 minutes or until crackers are golden brown. If the outer edges your pan are done but the crackers in the center still need a few more minutes- remove crackers on the edges and bake the center crackers for a few more minutes.

    Remove from oven and recut any squares that may be stuck together. Store in an airtight container for up to one week or freeze.

    Saturday, March 13, 2010

    One minute Ciabatta


    For your ciabatta you’ll need:
    • 4 cups of all-purpose flour
    • 2 cups of warm water
    • 1 teaspoon of salt
    • 1/4 teaspoon of granulated yeast (or equivalent)
    You’ll also need a medium-size mixing bowl, a 10×15 cookie sheet or baking stone, a hand towel or plastic wrap, and whatever you’d like to keep your bread from sticking (if you’re using a pan, I use flour and corn meal).
    Have everything handy? Good. Let’s do this!

    1. Mix Water & Yeast

    Pour the warm water into the medium-size mixing bowl and stir in the yeast with a spoon. No need to be particular, just dump and slosh.
    2. Add Flour And Salt
    Add flour and salt to your bowl of yeasty water. This, after measuring out the flour, presents another prime opportunity to get flour on your person. This will be regarded by many as a sign of your culinary determination. You’ll need such signs because anybody who actually watches you make the bread will think you’re one of the laziest bakers in existence.

    3. Stir Into A Heavy Batter

    Use a spoon. You could use your hands if you wanted but you probably didn’t wash your hands before starting this anyhow. Start with a quick run about around the perimeter of the bowl with your spoon. A few quick strokes through the middle and you should have a heavy batter. If it looks too thick to be pancake batter and not thick enough to be playdough, you’re right on target.

    4. Set It And Nearly Forget It

    Cover your project with a hand towel or plastic wrap and set in a safe place for a few hours. After the dough has rested for 8 to 12 hours, it will have nearly doubled in size. (If you add a bit of sugar at the start and you’re in a hurry, you can rush this process but I don’t recommend it for your first try.)

    5. Preheat Oven & Prepare Your Pan

    There’s a lot of room for variation at this stage. The goal is to place the dough onto a surface that will keep it from falling through the oven rack and not stick on. I use an old cookie sheet sprinkled with flour and corn meal. You can use a buttered pan, pizza stone, or baking paper. It’s up to you. The flour/cornmeal method takes only a few seconds.
    Before you start prepping your pan/stone, set your oven to 400F. (For those of you using wood stoves, don’t stress the particulars. Pull a few cedar shingles off the back porch roof and get that fire burning hot!)

    6. Pour Out The Batter

    This is the fun part! Uncover the bowl of dough and slowly pour it out onto the pan you just prepared for it. You’ll want to use a spoon to guide the dough into place and get the last bits out of the bowl. The dough will be very wet and sticky. That’s okay! Get the dough out onto the pan and if you’re lucky, it’ll look something like this:

    7. Add Spices (If Needed) & Place Bread Into 400F Oven

    If you’re trying to stay within the one-minute prep, you probably won’t have time to sprinkle some of your favorite herbs onto your ciabatta before baking. If you’re not worried about time, some dried oregano, basil, and rosemary make a nice addition.

    8. Remove Your Ciabatta From The Oven

    Check on your ciabatta after about 25 minutes. Once it’s golden brown on top and looks good to eat, take it out of the oven and set it aside to cool for at least 10 minutes. You can cut into it immediately but if you do it’ll collapse and won’t look as pretty.
    Wait! You really thought I wanted you to take a hot pan out of a 400F oven without some sort of protection? Craziness! If you don’t have an oven mitt handy, take off your shirt, fold it so there will be at least 6 layers of cloth protecting your hand, remove the pan from the oven and place in a safe spot to cool.

    9. Slice & Enjoy

    Move your ciabatta off the pan or baking stone and onto a proper cutting board for demolition and devouring. Ciabatta is famous as a sandwich bread but, like most breads, it’s absolutely delicious right out of the oven.

    Monday, February 15, 2010

    No Knead Bread


    3 cups all-purpose or bread flour, more for dusting
    ¼ teaspoon instant yeast
    1¼ teaspoons salt
    Cornmeal or wheat bran as needed.

    1. In a large bowl combine flour, yeast and salt. Add 1 5/8 cups water, and stir until blended; dough will be shaggy and sticky. Cover bowl with plastic wrap. Let dough rest at least 12 hours, preferably about 18, at warm room temperature, about 70 degrees.
    2. Dough is ready when its surface is dotted with bubbles. Lightly flour a work surface and place dough on it; sprinkle it with a little more flour and fold it over on itself once or twice. Cover loosely with plastic wrap and let rest about 15 minutes.
    3. Using just enough flour to keep dough from sticking to work surface or to your fingers, gently and quickly shape dough into a ball. Generously coat a cotton towel (not terry cloth) with flour, wheat bran or cornmeal; put dough seam side down on towel and dust with more flour, bran or cornmeal. Cover with another cotton towel and let rise for about 2 hours. When it is ready, dough will be more than double in size and will not readily spring back when poked with a finger.
    4. At least a half-hour before dough is ready, heat oven to 450 degrees. Put a 6- to 8-quart heavy covered pot (cast iron, enamel, Pyrex or ceramic) in oven as it heats. When dough is ready, carefully remove pot from oven. Slide your hand under towel and turn dough over into pot, seam side up; it may look like a mess, but that is O.K. Shake pan once or twice if dough is unevenly distributed; it will straighten out as it bakes. Cover with lid and bake 30 minutes, then remove lid and bake another 15 to 30 minutes, until loaf is beautifully browned. Cool on a rack.